Table of Contents
TYLER JURELLE
TYLER JURELLE
My LiteSpeed Cache Settings Guide for WordPress

Since starting my website in 2019, I have used various optimization plugins. However, the LiteSpeed Cache Plugin outperforms all its competitors in optimizing my WordPress website, especially after making major design changes and switching to ChemiCloud Hosting.
If you build your website using WordPress, I recommend using the LiteSpeed Cache plugin. It will help your website reach its full performance potential.
I also recommend switching to a better hosting provider like ChemiCloud. A quality host can improve your website’s performance, regardless of what page builder and optimization services you use.
Read More: ChemiCloud Review: The Best Web Hosting for Entrepreneurs >>> (will open a new tab so that you can continue reading my Ideal LiteSpeed Cache settings)
August 2025 UpdateAs of August 2025, I no longer design my website using Elementor. I have transitioned to KadenceWP. However, I still use LiteSpeed Cache to help optimize it.
For this article, I will share the LiteSpeed Cache plugin settings I implemented for my website when it was first designed with Elementor and now with KadenceWP. Even though I now use a different page builder, Elementor is still a good service for designing your website however you want without limitations.
If you design your website using Elementor, these LiteSpeed Cache setting recommendations are an ideal starting point, regardless of how Elementor improves in the future. They helped tremendously improve my website’s performance.
Disclaimer: I may earn a commission if you purchase through the links provided here, at no extra cost to you. Learn more about my partnerships.

About my Specific LiteSpeed Cache Settings
My specific LiteSpeed Cache plugin settings are based, first, on a tutorial provided by Tom from OnlineMediaMasters. He is the same expert who recommended me to my new web hosting provider, ChemiCloud.
My ideal LiteSpeed Cache plugin settings stem from:
- Default settings that are left unchanged.
- Help from ChemiCloud and QUIC.cloud customer support agents.
- OnlineMediaMasters LSCache tutorial.
- My own testing.
My ideal settings also factor in the limited use of Perfmatters because I embed third-party scripts into my website. Depending on the third-party script and how much of it, LiteSpeed Cache only sometimes succeeds at optimizing them. Using Perfmatters in a limited manner helps my website achieve maximum performance by optimizing what LiteSpeed Cache cannot.
I will explain why later in this article and other articles in my journal. If this applies to you and your website, I would also consider using Perfmatters in a limited manner.
Read More: My Limited Perfmatters Settings for WordPress Websites Using LiteSpeed Cache >>>
Disclaimer: Understand that everyone’s website is different. Therefore, these settings are not 100% guaranteed to help your website achieve the same performance results I have. Before proceeding, please use a staging tool to test these changes so you do not potentially ruin your visitor’s experience.
What is the LiteSpeed Cache Plugin?
The LiteSpeed Cache Plugin is a robust, all-in-one site optimization tool specifically designed to enhance the performance of WordPress websites that use LiteSpeed web servers. It optimizes all website data, including HTML, JavaScript, CSS, images, and more.
With its compatible (and free with ChemiCloud Hosting) QUIC.cloud CDN, LiteSpeed Cache temporarily stores website data so that it can be quickly retrieved and displayed to visitors. By creating a cache of your website’s pages, the LiteSpeed Cache Plugin can serve pages to visitors much faster than if they were generated from scratch every time.
LSCache for WordPress is known for being one of the fastest and most effective cache plugins available. It is designed to work seamlessly with various hosting providers and server configurations to help optimize almost any website. However, it works best with hosting providers that use LiteSpeed Web Servers, such as ChemiCloud.
The key benefits of using the LSCache Plugin are that it can significantly reduce page loading times and dramatically improve user experience. Because your pages load quickly and smoothly, visitors are likelier to stay on your website and engage with your content. In addition, faster page loading times can lead to improved search engine rankings, as search engines like Google take page speed into account when ranking websites.
LiteSpeed Cache and Page Builders
The LiteSpeed Cache Plugin is ideal for websites designed with page builders such as:
- Gutenberg (the default page builder for WordPress)
- Elementor
- KadenceWP
- Astra
- And more.
Any page builder can slow down your website because of all the widgets you use to design it. This is why having a quality hosting provider and a caching plugin are crucial to ensuring that your website performs well and can earn and retain a growing audience.
In my growing years of experience building and refining this website and other websites for my businesses within my holding company, Jurelle Enterprises, ChemiCloud hosting, its compatibility with LiteSpeed Cache, and free access to the enterprise features for QUIC.cloud CDN consistently helps my website achieve maximum performance, first when it was built with Elementor and now with KadenceWP.
General Features
The LiteSpeed Cache plugin can be used by anyone and for any website. It does not matter which web server your website uses (LiteSpeed, Apache, NGINX, etc.) or how it is designed. Its general features include:
- Free QUIC.cloud CDN Cache
- Object Cache (Memcached/LSMCD/Redis) Support (ultimately depends on your hosting provider)
- Image Optimization (Lossless/Lossy)
- Minify CSS, JavaScript, and HTML
- Minify inline & external CSS/JS
- Combine CSS/JS
- Automatically generate Critical CSS
- Lazy-load images/iframes
- Responsive Image Placeholders
- Multiple CDN Support (full compatibility varies)
- Load CSS Asynchronously
- Defer/delay JS loading
- Browser Cache Support (full compatibility varies)
- Database Cleaner and Optimizer
- PageSpeed score (including Core Web Vitals) optimization
- Opcode Cache Support (ultimately depends on your hosting provider)
- HTTP/2 Push for CSS/JS (on web servers that support it)
- DNS Prefetch
- Cloudflare API
- Single Site and Multisite (Network) support
- Import/Export settings
- Attractive, easy-to-understand interface (debatable)
- WebP image format support
- Heartbeat Control
LiteSpeed Web Server
To achieve consistently high performance, your website needs at least three things:
- A high-quality web hosting provider that uses advanced backend technology. I recommend ChemiCloud.
- A caching plugin (preferably one that includes image optimization).
- A CDN, such as Cloudflare or QUIC.cloud CDN (part of the LiteSpeed Web Server). This is a content delivery network that makes it easy to quickly serve website content to visitors around the world.
- An image optimization plugin if your caching plugin does not include it.
My new hosting company, ChemiCloud (which I recommend you check out), is powered by LiteSpeed Web Server. LiteSpeed Web Server includes the LiteSpeed Cache plugin and QUIC.cloud CDN, Cloudflare CDN’s ONLY alternative worth switching to. Yes, LiteSpeed Cache and QUIC.cloud include seamless image optimization, but more on that later.
Read More: ChemiCloud Review: The Best Web Hosting for Entrepreneurs >>>
So, What is the LiteSpeed Web Server?
The LiteSpeed Web Server is a high-performance software designed to provide maximum speed and scalability for websites. It is an alternative to the popular Apache and Nginx web servers and is known for being faster and more efficient than its counterparts. If you’ve asked, “Is LiteSpeed better than nginx?” The answer is “YES!”
LiteSpeed uses industry-standard tech to help websites perform their best. One of its key features is its ability to handle many concurrent connections, making it ideal for websites with high traffic volumes. It is also designed to be highly scalable, which means it can easily handle sudden spikes in traffic without experiencing any downtime or slowdowns.
The LiteSpeed Web Server is compatible with many web technologies, including PHP, Python, Ruby, and Perl. It also supports popular content management systems like WordPress, Joomla, and Drupal, making it a popular choice for web developers and website owners.
In addition to its speed and scalability, the LiteSpeed Web Server includes many advanced features for optimizing website performance, such as the LSCache Plugin and the QUIC.cloud CDN.
Overall, the LiteSpeed Web Server is an excellent choice for anyone looking for a high-performance web server that can handle large traffic volumes and provide fast, reliable website performance.
LiteSpeed Exclusive Features
If your hosting provider uses LiteSpeed Web Servers and any of the products within its ecosystem, you will have access to more exclusive features in the LSCache plugin. They include:
- Automatic page caching to improve site performance greatly
- Automatic purge of related pages based on specific events
- Private cache for logged-in users
- Caching of WordPress REST API calls
- Separate caching of desktop and mobile views
- Ability to schedule purge for specified URLs
- WooCommerce and bbPress support
- WordPress CLI commands
- API system for easy cache integration
- Exclude from cache by URI, Category, Tag, Cookie, User Agent
- Intelligent preload crawler with support for SEO-friendly sitemap
- Multiple crawlers for cache varies
- HTTP/2 support
- HTTP/3 & QUIC support
- ESI (Edge Side Includes) support
- Widgets and Shortcodes as ESI blocks* (requires Classic Widgets plugin for WP 5.8+)
[kadence_element id=”26565″]
LiteSpeed Cache vs the Competition
When it comes to WordPress caching plugins, the choices seem endless. Finding the perfect one is crucial for enhancing the performance of your WordPress website. Of all the caching plugins I’ve used for this website, LiteSpeed outperforms them all.
After changing hosting providers that allow me to use LiteSpeed Cache and significantly cleaning up my webpage designs, my website is now performing at its best. As a result, my organic search traffic is steadily increasing.
Some advantages of LiteSpeed Cache include:
- LiteSpeed Web Server integration: LiteSpeed Cache integrates well with the LiteSpeed Web Server, now the gold standard for web hosting servers. If your hosting provider does not use LiteSpeed Web Servers, consider switching to one that does. This is especially true if your website is designed with a page builder. I recommend ChemiCloud! Check out my official ChemiCloud review to learn more about this hosting provider.
- Serve-Level Full-Page Caching: LiteSpeed Cache employs server-level full-page caching to significantly boost your website’s loading speed. Serving cached pages directly from the server eliminates the need for repeated processing of dynamic content and database queries, resulting in a highly optimized and efficient website experience for your visitors.
- Comprehensive Optimization Features: LiteSpeed Cache offers a wide range of optimization features to improve website performance, including image and object optimization, CSS, and JavaScript minify. This comprehensive solution eliminates the need to purchase multiple optimization plugins for different purposes.
Popular LiteSpeed Cache competitors I have experience using include:
LiteSpeed Cache vs WP Rocket
One of the first caching plugins I primarily used, even paid for, was WP Rocket. While I appreciate WP Rocket for introducing me to the many settings available to optimize my website, it could not meet my long-term needs. I could not achieve the best performance results I am now experiencing with LSCache.
LiteSpeed Cache
LiteSpeed Cache is a built-in caching solution for LiteSpeed web servers, known for their exceptional speed and efficiency. Thus, LSCache is specifically designed to work with LiteSpeed servers, resulting in faster and more efficient page loading times.
LSCache offers various features, including page caching, database optimization, image optimization, and lazy loading. It also provides advanced features like Edge Side Includes (ESI) and HTTP/3 support, which can further improve website performance.
WP Rocket
WP Rocket, on the other hand, is a standalone plugin that can be used with various web servers. WP Rocket offers similar features to LiteSpeed Cache, such as page caching, minification, and lazy loading. It also provides additional features like database optimization, image optimization, and CDN integration. However, WP Rocket does not offer advanced features like ESI or HTTP/3 support.
LiteSpeed Cache vs SiteGround Optimizer
When I used SiteGround to host my website, I also used their optimizer plugin to optimize it. It was my first experience using an in-house optimizing plugin that I did not have to pay for separately. Unfortunately, SiteGround Optimizer and the hosting did not help my website reach my desired performance.
LiteSpeed Cache
LiteSpeed Cache is a plugin designed for sites hosted on LiteSpeed web servers. The server-level full-page caching guarantees fast loading times, thus laying the foundation for an optimized and user-friendly experience. It offers a range of features, including page caching, object caching, and browser caching. It also has a built-in image optimization tool and supports HTTP/2, HTTP/3, and QUIC protocols. With LiteSpeed Cache, web pages can load with lightning speed, improving website performance and enhancing customer satisfaction.
SiteGround Optimizer
SiteGround Optimizer, on the other hand, is a caching plugin developed by SiteGround, a popular web hosting provider. It offers similar features to LiteSpeed Cache, such as page caching, object caching, and browser caching. Additionally, it includes a tool for minifying HTML, CSS, and JavaScript files and a lazy loading feature for images.
However, its scope may be limited to websites not hosted on the SiteGround platform. Even for websites hosted on SiteGround, the optimizer still does not help achieve the best possible web performance.
LiteSpeed Cache vs Perfmatters
Before using LiteSpeed Cache with my new hosting provider, ChemiCloud, I used a plugin called Perfmatters in conjunction with any other caching or optimization plugin I used. Perfmatters advertises itself as a site optimization plugin that works well with similar plugins. My goal was for Perfmatters to optimize my website further wherever my main plugin could not.
Now that I use LiteSpeed Cache, I still use Perfmatters to optimize my website further because it uses some third-party scripts. However, I use Perfmatters with LSCache less than I did with other site optimization plugins. LiteSpeed Cache does a good job optimizing my website on its own, but Perfmatters further optimizes it in ways that LSCache may miss.
Perfmatters does an excellent job of regulating the sometimes excessive amount of DOM elements involved in building websites with Elementor. It also better determines what is above the fold and ensures it loads as fast as possible.
Page Builder Settings to Implement BEFORE Setting Up LiteSpeed Cache
As As I said earlier, you will need a quality caching plugin for your website because the page builder you used to design it will slow it down. The more widgets you use, even if just text, the slower your website gets because they all have to load.
A high-quality caching plugin, like LiteSpeed Cache, ensures that all of the widgets of your chosen page builder you use to design your website load in a structured manner so that your website loads fast and functions well for new and returning visitors. However, your chosen page builder most likely has performance settings that may or may not need to be turned on because they can:
- Conflict with any LiteSpeed Cache settings
- Give LiteSpeed Cache fewer aspects of your website to optimize, resulting in faster initial performance before setting up LSCache.
In this section, I will share the settings I implemented for the page builders I have used since switching my websites to ChemiCloud Hosting and using the compatible LiteSpeed Cache with QUIC.cloud CDN. Those page builders include:
- Elementor, my now former page builder (I’ll explain why)
- Kadence WP, my current page builder.
Elementor

Elementor, a drag-and-drop page builder, dramatically improved its base speed performance before using a caching plugin and a CDN. It was notorious for severely slowing down websites due to its ability to visually take over and create any web design without structural limits. However, its implementation of flexbox containers allows widgets to be organized in one section without the need for too many columns and inner sections, thus improving the loading speed of web pages.
Even though Elementor has made further improvements to its page builder to improve the load and user experience of webpages designed with it, I could no longer continue to use it. Over time, its updates have become increasingly unstable and untrustworthy.
More aspects of my webpage designs were increasingly disappearing or needing fixing. Anticipating the next update to resolve the issues, only for them to not fix them and cause more problems, became increasingly frustrating for me.
Ideal Elementor Settings
When I designed my website using Elementor, I used the following settings to improve its performance BEFORE setting up LiteSpeed Cache. If you are still using Elementor, keep these settings in mind as the page builder continues to improve.
When setting up Elementor before LiteSpeed Cache, I recommend you:
- Use Hello Elementor as the Child Theme of your Website
- Turn on the FlexBox and Grid Containers Settings
- Enable Optimized Gutenberg Loading
- Enable Optimized Control Loading
- Leave All Image Optimization Settings Off/Disabled
- Do Not Use Google Fonts
1. Use Hello Elementor as the Child Theme of your Website
It does not matter what theme you use for your website. Suppose you feel like your theme is limiting your website’s design potential. In that case, Elementor allows you to replace the default Gutenberg Page Builder to design any web page however you want with no limits.
However, replacing the Gutenberg builder with Elementor means that your Elementor design will load after the backend Gutenberg elements that are still present, even though you are not using them. This could slow down your website.
Setting Hello Elementor as your default child theme allows you to design your website however you want, with no backend limitations. You can then better incorporate your Elementor design and structure with the default Gutenberg page builder. Hence, your website has a solid foundation for loading fast before incorporating a caching plugin and CDN.
2. Turn on the FlexBox and Grid Containers Settings
The Flexbox and Grid Containers are new features on Elementor that, when implemented correctly, can tremendously impact your website’s performance. They replace the popular section/column web design structure by allowing users to create advanced layouts and responsive designs within one container section.
These features’ primary benefit is that they allow multiple widgets to be included within a single container section. This approach eliminates the need for creating numerous inner sections and columns, which can complicate the layout and increase the volume of backend code. You can streamline the design process and enhance website performance by minimizing the number of sections and simplifying the structure.
Flexbox Container = ACTIVE
According to Elementor, you can add as many widgets as you want to one container with Flexbox Containers. You can then alter each widget’s width, height, and order to best fill the container’s available space. Finally, these settings are responsive to mobile phones, tablets, etc.
Flexbox Containers correlate to everything I covered earlier, including Grid Containers, DOM output, asset loading, and CSS loading. By designing your website with flexbox containers instead of regular sections and columns, you will:
- Cut half the time it would typically take to build your website.
- Reduce the code used on your website that has to load for every visitor.
- Improve your website’s load time and performance.
- Increase your website’s responsiveness and compatibility with more devices.
Remember that implementing Flexbox containers for your website will require some learning. Before diving right in, I recommend you check out Elementor’s various tutorials on their Help Center blog and YouTube channel.
Grid Container = ACTIVE
This feature should be active if you want to create a symmetrical layout for a webpage, such as a listings page. According to Elementor, grid containers consist of widgets in a grid that will be consistent throughout a webpage. This feature allows you to set how many rows and columns those widgets in a grid will repeat on its webpage. This is a faster alternative to adding individual containers one by one, both in terms of process and overall web performance.
3. Enable Optimized Gutenberg Loading
When I designed my website using Elementor and enabled the Optimized Gutenberg Loading setting, I noticed that the “reduce initial server response time” error I sometimes get in various PageSpeed Insight test results decreased in severity or was eliminated.
As mentioned, when using Elementor to design your website, you can still access most Gutenberg widgets from WordPress’s default page builder. However, whether or not you use them in your Elementor-designed webpages, these widgets are still loading on the back end of your website.
This performance setting helps reduce unnecessary render-blocking loads by preventing unused Gutenberg block editor files from loading. As a result, your website’s performance will improve because fewer styles and scripts are loading in the background.
4. Enable Optimized Control Loading
Optimized Control Loading is a setting that is supposed to improve asset loading by only loading widgets when visitors interact with their location on a webpage. Websites with many web pages, each with complex or extensive designs, would find this a helpful setting because it only loads what is in the viewpoint of visitors’ screens.
Upon further research, I found a GitHub discussion forum. In the thread, a contributor with the username ‘betatester07’ explained that this setting should improve the TTFB (Time to First Byte) metric by optimizing the rendering process.
5. Leave All Image Optimization Settings Off/Disabled
It’s not that Elementor’s image optimization is bad; however, I recommend leaving these settings off. Instead, use LiteSpeed Cache and QUIC.cloud CDN’s image optimization. This way, you can use settings like Low-Quality Image Placeholder, which prevents page layout shifts while images are lazy loading.
6. Do Not Use Google Fonts
Over time, I learned that loading Google Fonts with all the other widgets used to design your website can make a small but noticeable difference in its overall performance. Even though there are ways you can alter how and when they are loaded, I recommend keeping Google fonts turned off and using a Serif-sans default system font instead, like Helvetica, because they are already stored in the backend of your website, making them easy to load quickly.
Kadence WP

I started researching alternatives when I became frustrated with Elementor’s increasingly unstable updates, which were messing up my website. While looking, Kadence WP kept coming up, so I decided to look into them further. The consistently positive reviews from current users helped solidify my decision to switch to them.
As of July 2025, I am still getting a feel for Kadence WP and its full impact on my website. However, so far, I am very impressed. For starters, it has a lot of settings within the Customize section of the theme settings. This allows me to design as many aspects of the overall website in one place, such as the header, footer, and the standard layouts for all posts, pages, categories, and tags, so that I can focus on the content of the individual ones using the default Gutenberg page builder.
Speaking of the default Gutenberg page builder, I also like that Kadence WP integrates exceptionally well. I can add all of Kadence’s widget offerings, which are strikingly similar to Elementor’s, within the Gutenberg page builder. One important Kadence widget is Flexbox containers, which is identical in functionality to Elementor’s version.
Another unrelated surprise is that since I switched, I’ve noticed that more search engines besides Google, like Bing, are now indexing my website. When using Elementor, specifically after switching to ChemiCloud hosting, my website struggled to be indexed by Bing and other search engines, only Google. However, this now no longer appears to be an issue.
Ideal Kadence WP Settings


So far, Kadence is doing just as well as Elementor at making my website visually appealing and user-friendly to visitors. Most importantly, my website loads just as fast, if not faster, than when I was using Elementor to design it. Finally, based on the growing reception from additional search engines, Kadence WP is also doing a better job than Elementor at structuring the backend of my website.
Customize > General > Performance
What I like about Kadence is their theme has a lot of settings in the Customize section of my WordPress Admin interface. Compared to the Hello Elementor theme, which has virtually no customize settings, the Kadence Theme lets you design the primary look of your entire website in one place so that you can focus on individual posts and pages.
To ensure your website performs well before implementing LiteSpeed Cache, you must first turn on Kadence Theme‘s Performance settings. If you look at the nearby screenshot, you will see that I turned on all settings, including:
- Enable Microdata Schema = ON
- Enable Optimized Group Block = ON
- Enable Scroll to ID = ON
- Enable Lightbox = ON
- Load Google Fonts Locally = ON
- Preload Local Fonts = ON
- Enable CSS Preload = ON
Turn ON Infinite Scrolling
Another beneficial setting Kadence Theme allows users to control is infinite scrolling for all listing pages, such as:
- Blog archive pages like categories and tags
- Search listings
- Product listings
- Custom listing pages
Enabling infinite scrolling on your website is crucial. It allows users to continue browsing without clicking on different pages, creating a smoother experience. This is especially true for mobile users, who can scroll continuously to see more content.
Infinite scrolling also helps with the initial loading of your website because it ensures that only the content at the beginning of the page loads immediately. This helps reduce stress on the server by only loading more content as users scroll down the page.
This feature encourages people to explore more of the site and can lead to higher page views, which benefits user engagement. Please make sure you implement it in a way that remains user-friendly. Depending on your website, not implementing infinite scrolling correctly can hurt your search engine rankings.
Pro Addon Settings
If you switch to Kadence WP, I highly recommend buying the Full Bundle to take advantage of all Kadence offers. The Full Bundle comes with both Kadence Theme Pro and Kadence Block Pro, which provide more settings for the Kadence Theme and more widgets you can use to design your website.
For the sake of performance, make sure Local Gravatars is one of the add-on settings you turn on for your website, especially if you have a blog that accepts comments. This setting loads the Gravatar profile pictures of people who leave a comment on your blog post locally on your website’s server. A Gravatar profile picture will only appear if the commenter links their WordPress-hosted website to their comment.
My Ideal LiteSpeed Cache Settings
Now that I have shared the backend settings for the page builders I use for my website, I want to share the LiteSpeed Cache settings I use to ensure my site performs well. As stated in the beginning, these ideal settings come from my own tests and the help of outside sources.
My goal for sharing these settings is to help make setting up LiteSpeed Cache less complicated for you. This optimization plugin is a powerful yet complex tool for your website. One wrong setting or two could cause your site to miss its true performance potential or crash.
If you have a robust hosting provider for your WordPress, my guide could help you regardless of which page builder you use. However, I cannot guarantee 100% success for everyone because all websites differ. Please be willing to seek other sources for help if you feel to or must deviate from my guide for specific settings.
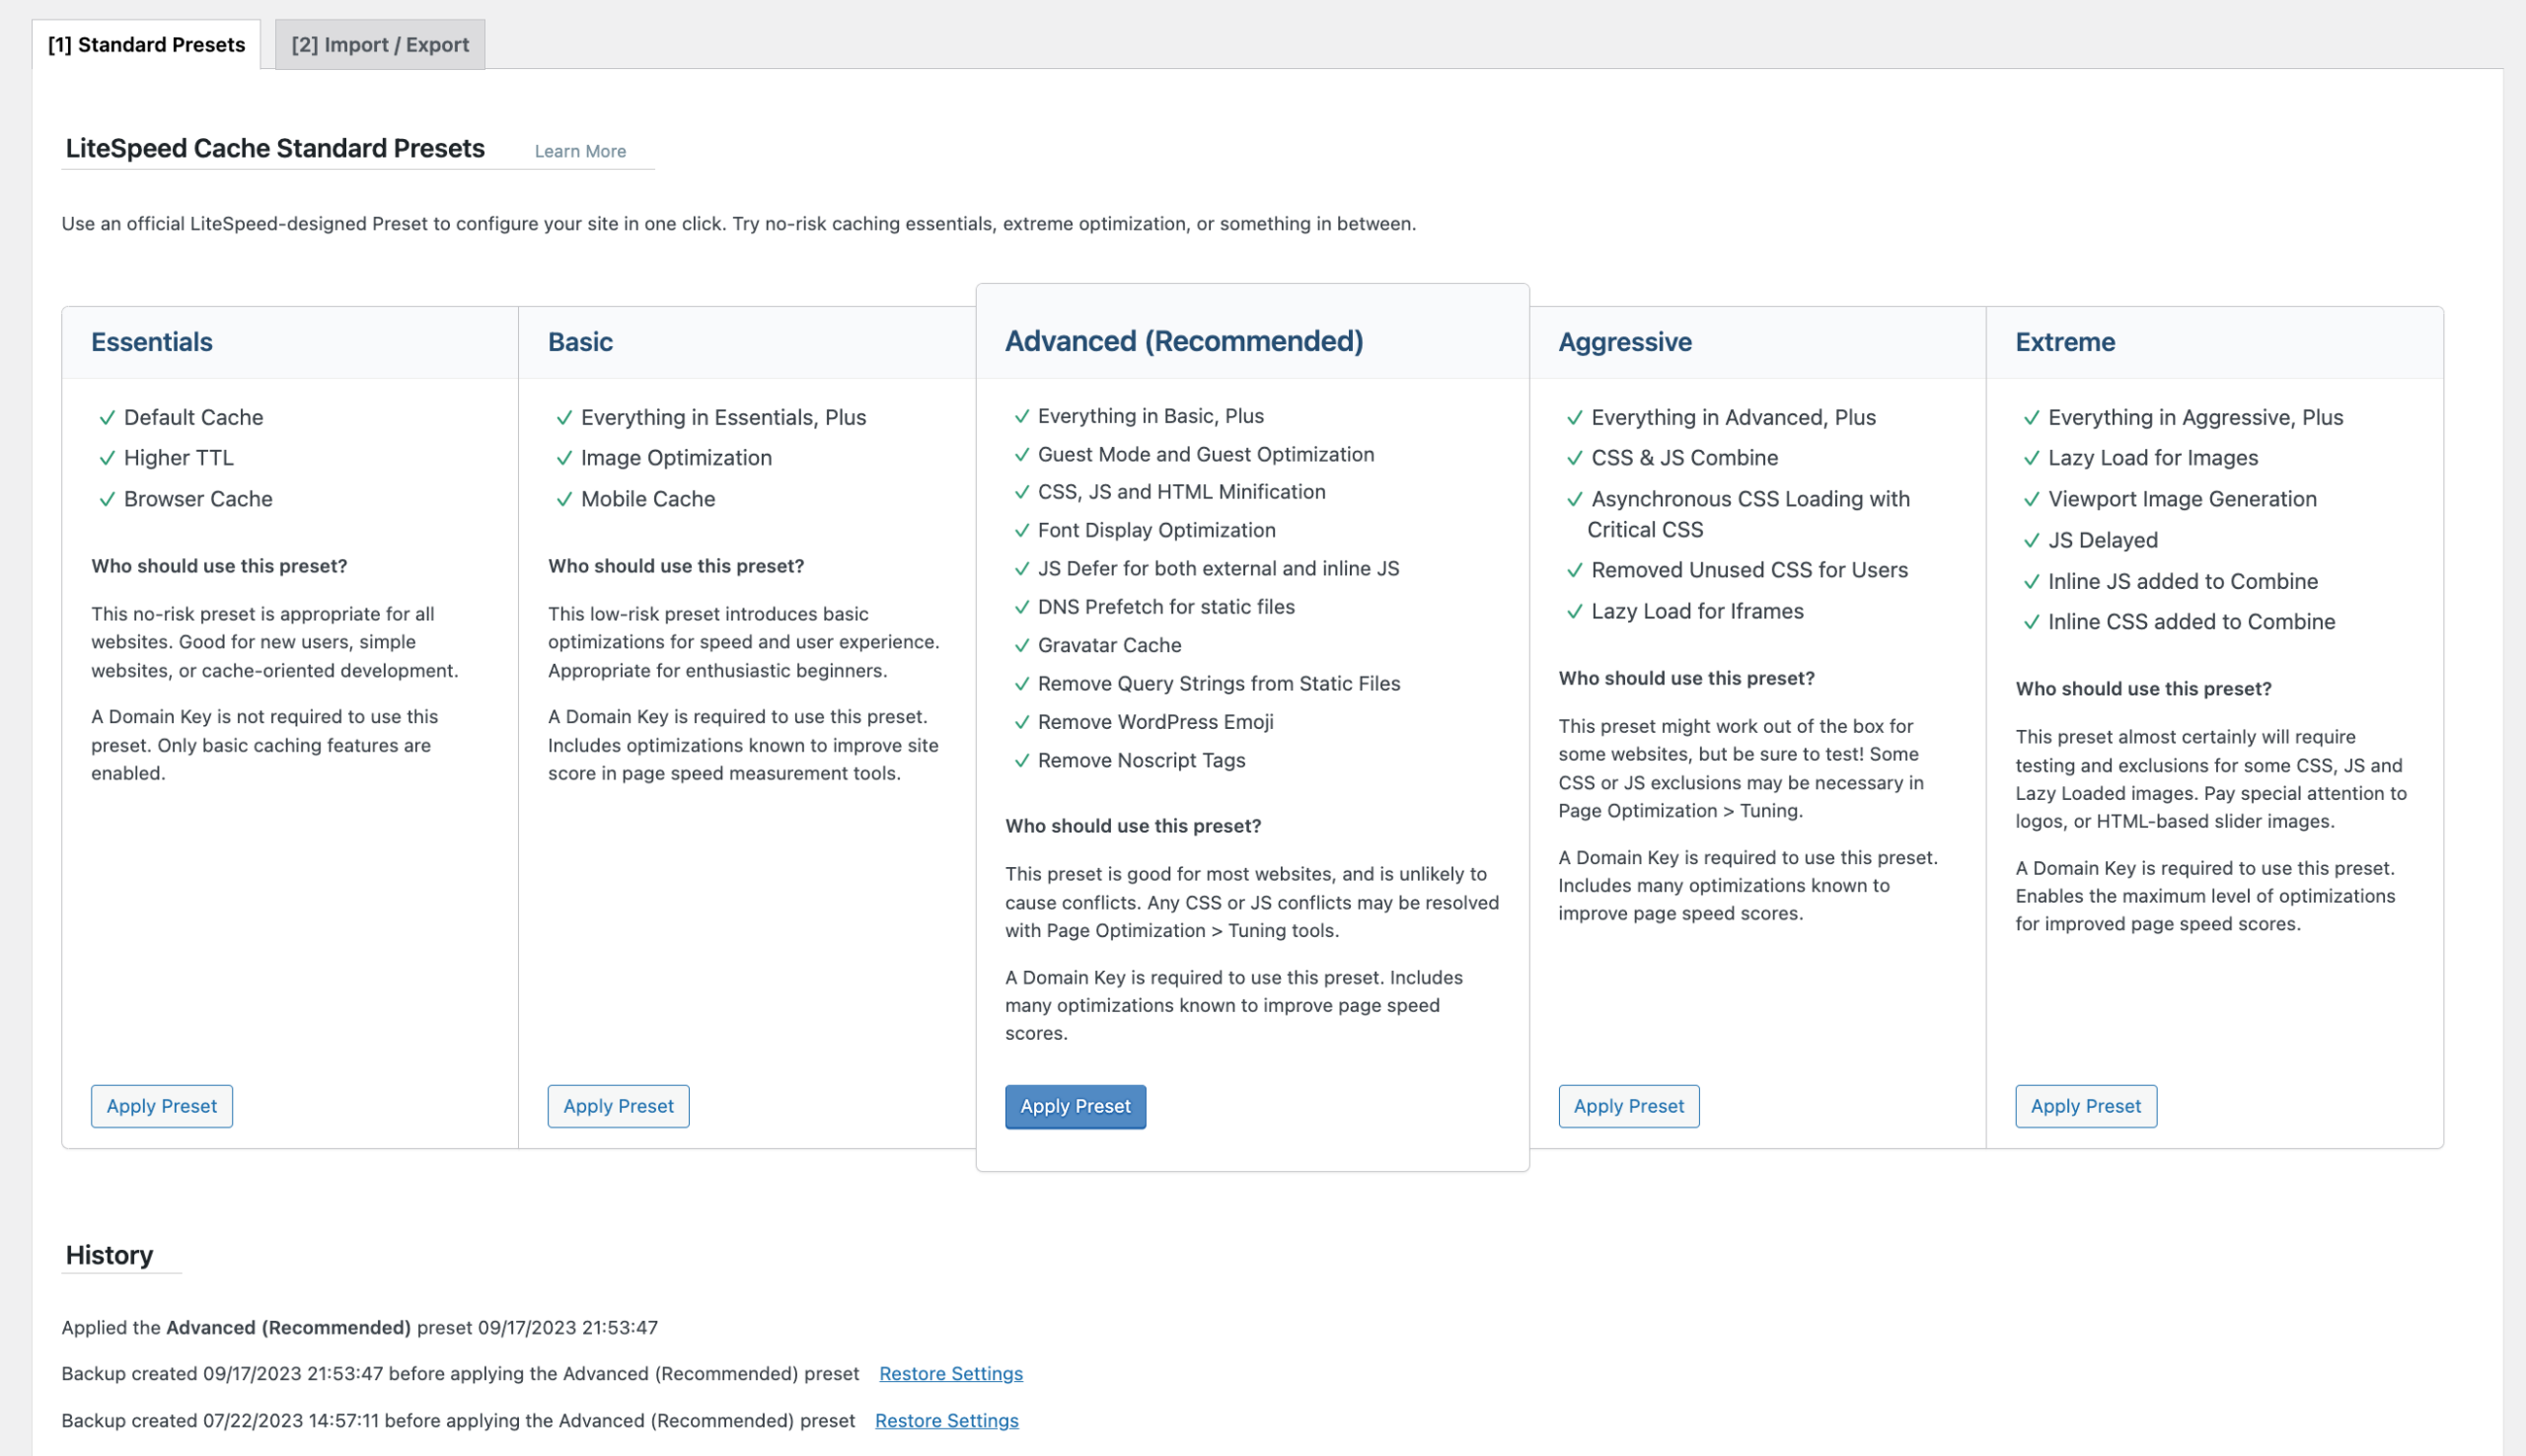
Presets
One great thing about LiteSpeed Cache is its preset settings for beginners. If you browse through LiteSpeed Cache’s settings and find yourself overwhelmed or unsure about how to set it up, it’s okay. Choose from any official LiteSpeed-designed presets below to help configure your site in one click.
Some people may want to choose a preset and be done with this process, but I do not recommend it. Every website is different! By selecting a preset, you could either:
- Miss out on additional ways to optimize your website as best as possible.
- Mess up your website because of a setting included in a preset you chose.
I created this guide to help beginner users like myself optimize their websites with LiteSpeed Cache. I tried getting away with using a preset, and both instances above occurred. As a result, I spent time testing my website with each setting to determine the best configuration to achieve my current performance results.
Essentials
The Essentials preset only enables basic caching settings, including:
- Default Cache
- Higher TTL
- Browser Cache
This preset is ideal for new users, simple websites, or cache-oriented sites.
Basic
The Basic preset enables basic optimizations for speed and user experience. It includes everything in the Essentials preset, plus:
- Image Optimization
- Mobile Cache
Advanced
The Advanced preset is the most recommended preset. It enables more settings that should be good for most websites, including those designed with Elementor. It is unlikely to cause conflicts in most settings except CSS and/or JavaScript. This is why further testing is necessary, specifically with Page Optimization > Tuning tools.
This preset includes everything in the Basic preset, plus:
- Guest Mode and Guest Optimization
- CSS, JS, and HTML Minify
- Font Display Optimization
- JS Defer for both external and inline JS
- DNS Prefetch for static files
- Gravatar Cache
- Remove Query Strings from Static Files
- Remove WordPress Emoji
- Remove NoScript Tags
Aggressive
Depending on the level of design your website has, the Aggressive preset, as it is set up, may work for you. However, be sure to test with Page Optimization > Tuning tools.
This preset includes everything in the Advanced preset, plus:
- CSS & JS Combine
- Asynchronous CSS Loading with Critical CSS
- Removed Unused CSS for Users
- Lazy Load for Iframes
Extreme
The Extreme preset enables the most settings that will most certainly require testing. Some of that testing will likely include exclusions for CSS, JavaScript, and Lazy Loaded images. Speaking of images, you may have to pay specific attention to logos or slider images.
This preset includes everything in the Aggressive preset, plus:
- Lazy Load for Images
- Viewport Image Generation
- JS Delayed
- Inline JS added to Combine
- Inline CSS added to Combine
General
The General section is the starting point for your site-optimizing journey.
1. General Settings
Automatic Upgrade = YOUR CHOICE
You can choose to have LiteSpeed Cache update automatically or manually. Either option does not impact your site’s performance.
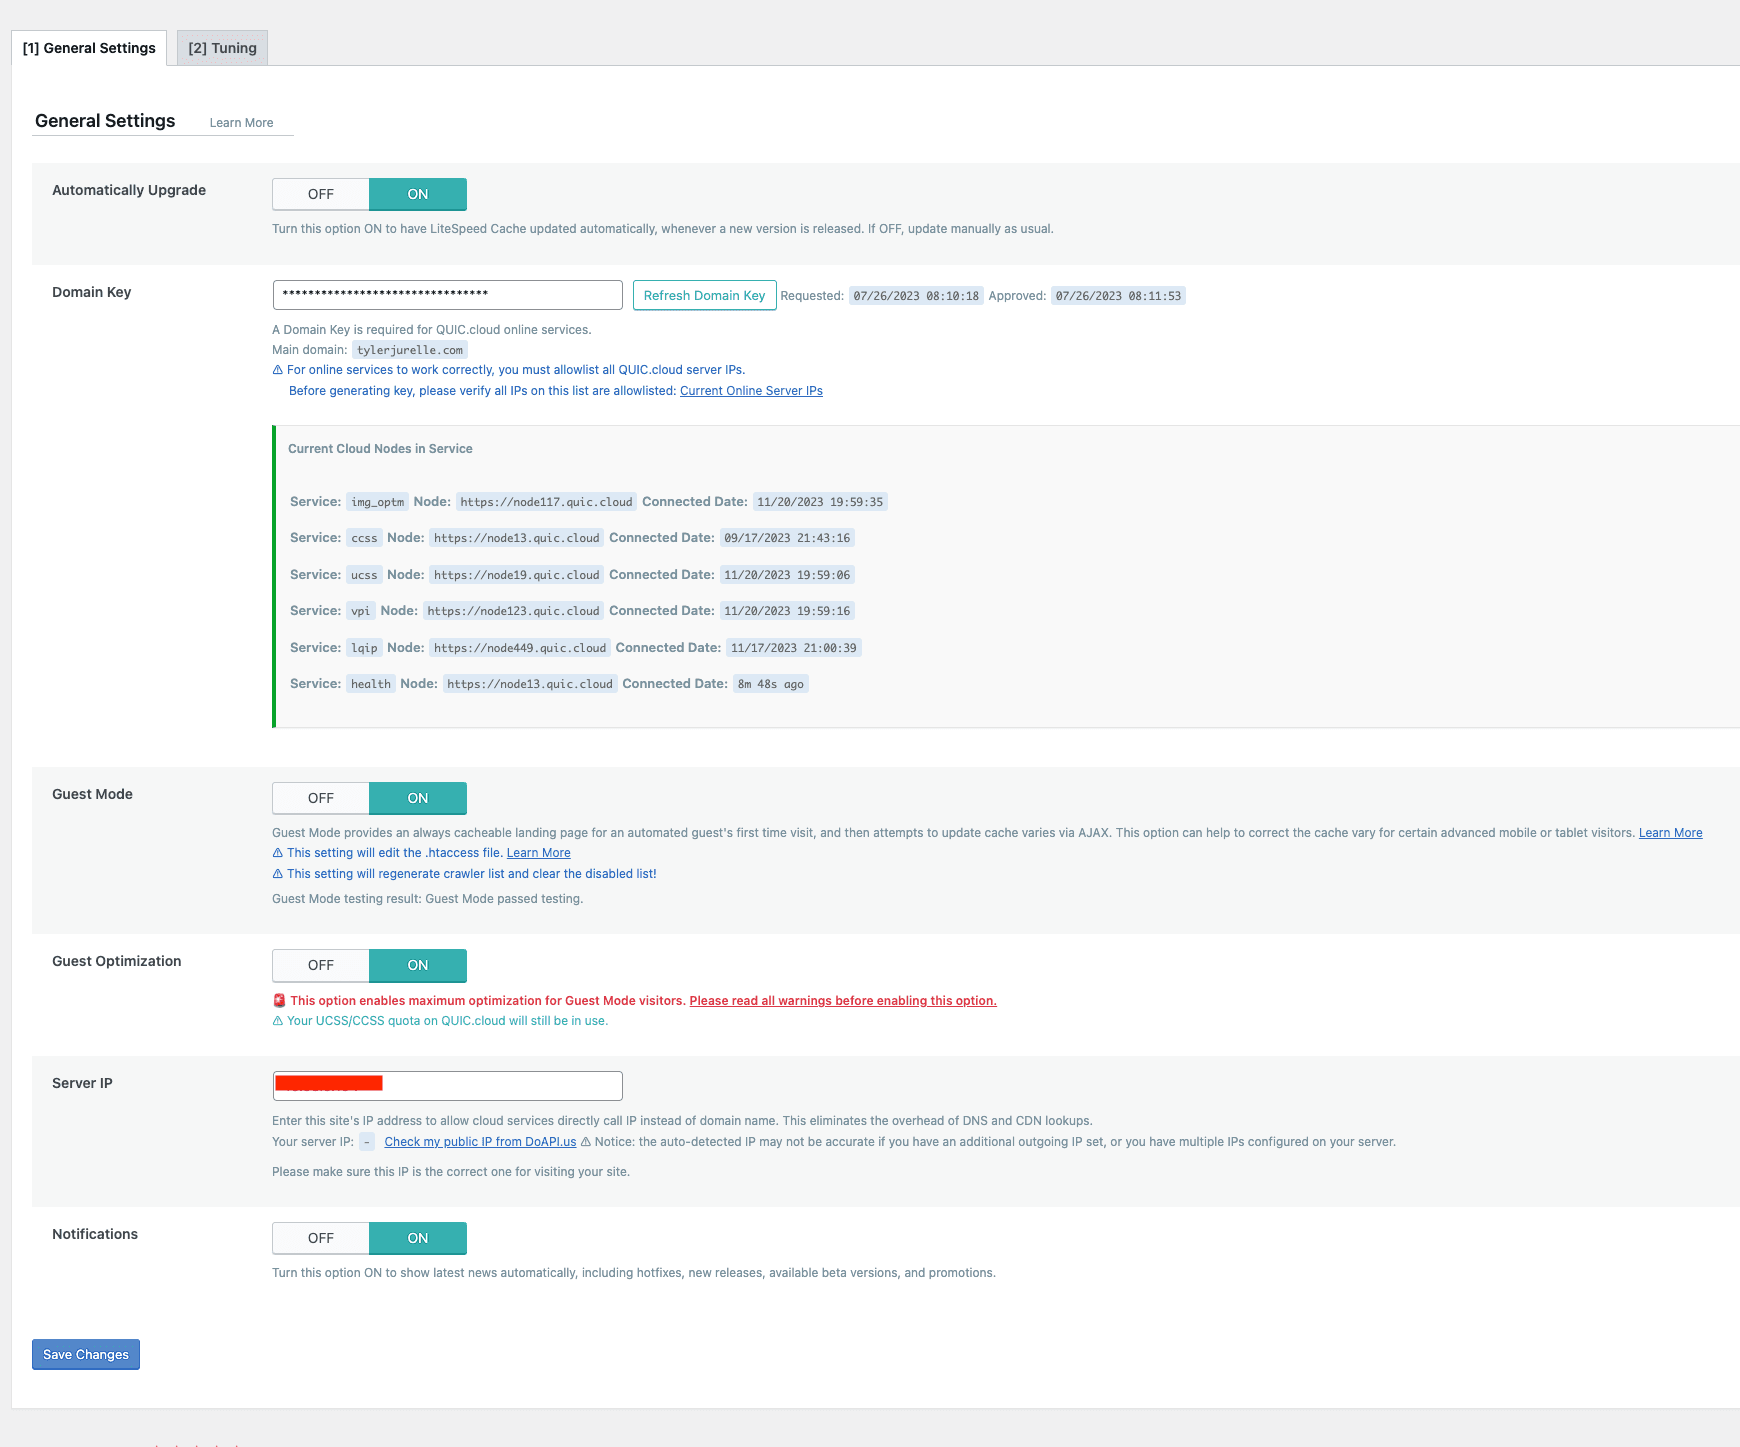
Domain Key
Request a domain key here, and one will automatically be generated. I recommend using QUIC.cloud CDN, so make sure to link this Domain Key there.
Guest Mode = ON
When turned on, Guest Mode provides a default version of your website for a visitor’s first access. I recommend turning this setting on because it is the first that helps improve PageSpeed Insight scores. It ensures that your webpage performs its absolute best for first-time visitors.
Guest Optimization = ON
This setting will enable maximum optimization for guest visitors in addition to the Guest Mode setting above. For example, page and image optimizations will be aggressive for first-time visitors.
Warning About Guest Mode and Optimization
When turning on Guest Mode and Optimization for your website, understand that Google may have difficulty properly recognizing the mobile layout of several web pages. As a result, you may temporarily (not right away or for too long) receive mobile usability errors for those one or two pages.
This discrepancy does not mean that you did anything wrong. It also does not mean you will not receive search traffic from mobile devices on those affected pages. Finally, it does not happen often. I only experienced this once in my first year using LiteSpeed Cache. This issue is really on them, and it is a matter of when they will finally fix it.
After reading several support forums for people who have already experienced this, LiteSpeed swears that this does not affect visitors. However, I hope they understand how much of a problem this can be for Google and how it could affect our websites’ crawling and showing in search results.
The easiest way to avoid this is to turn off Guest Mode and Optimization. However, that will mean your website will only be partially optimized. As a result, your PageSpeed Insights tests will report back an entire list of issues you will be responsible for manually fixing with other settings throughout LiteSpeed Cache. Speaking from experience, because I tried this route, it is time-consuming, and I could never optimize my website as well as Guest Mode and Optimization do when turned on.
To be clear, LiteSpeed Cache warns users about turning on these two settings. However, the shallow risk is worth it. Again, it will not last long or cause you to lose traffic. Also, you’ll probably experience it once or twice, max.
Server IP
For this setting, click “Check my public IP from DoAPI.us.” Once your server’s IP address shows up, paste it here.
Notifications = YOUR CHOICE
You can choose whether or not to receive notifications from LiteSpeed about new releases or other updates. This has no impact on your website’s performance.
2. Tuning
The entire Tuning section you can leave alone. This lists all the IP addresses of automated visitors, such as search engine crawlers and page speed test bots. As a result, these crawlers and test tool bots WILL NOT be included in your page view analytics.
According to LiteSpeed, as long as Guest Mode is enabled, whenever you test your website’s performance using a third-party service, or Google crawls your website, they will always be served a cacheable landing page. This way, you will receive positive test results and a successful crawl every time.
The best part is that these lists are automatically updated with known bots. So, you only need to do something here if you use a third-party service with unknown automated bots.
Cache
The cache section features all the ways to cache your website to achieve maximum performance. This section is part of what helps LiteSpeed Cache stand out from its popular competitors.
1. Cache Control Settings

Enable Cache = ON
This setting must be turned on to enable this plugin’s caching functionality.
Cache Logged-in Users = DEPENDS ON YOUR WEBSITE
This setting is for you if you build a website with exclusive content that users must sign up for and log in to access.
Cache Commenters = DEPENDS ON HOW YOU HANDLE COMMENTS ON YOUR BLOG POSTS
If you are building a blog and want to moderate your comments to prevent spam, this setting should be turned on. What it does is it caches your site for people who leave comments on your blog posts that are pending and waiting for your final approval. However, according to Tom from OnlineMediaMasters, this setting could consume many resources if you do not moderate your comments and receive a lot. Therefore, it can negatively impact performance.
Cache REST API = ON
Turn this setting on to cache requests made by WordPress REST API calls. This includes themes, plugins, and the WordPress Block Editor.
Cache Login Page = ON
This setting MUST be turned on, regardless of whether you’re running an e-commerce website. Otherwise, it will negatively affect performance.
Cache PHP Resources = ON
This setting caches resources from themes and plugins loaded via a PHP request. This typically includes static PHP files such as CSS and JavaScript. Unless you know your website has dynamic CSS and JavaScript loaded in PHP, which is unlikely, this setting should be on.
Cache Mobile = ON
The Cache Mobile setting creates a separate cache copy for mobile visitors. I recommend turning this setting on because it is a primary solution for poor mobile PageSpeed test scores. Also, this will help the responsive features of both Elementor and Kadence WP to help distinguish your mobile web pages from their desktop versions.
Before using LiteSpeed Cache, regardless of the hosting provider I used, one problem I could never solve was having a well-optimized mobile version of my website. Even if I could achieve good PageSpeed Insight and GTMetrix scores for the desktop version of my website, the mobile version test scores needed to be better. No matter what I do, my mobile test scores always hover between 50 and 75 out of 100.
Since turning on Cache Mobile, my PageSpeed Insights test scores for the mobile version of my website have now achieved at least 85. Most of my web pages’ mobile test scores actually achieve 90 or better, which is ideal.
While this setting alone is not enough, it is an excellent start to finally having a well-optimized website for your mobile visitors. As a result, mobile search traffic is likely to increase. So far, mine has.
List of Mobile User Agents = LEAVE ALONE
Private Cache URLs = LEAVE ALONE
Force Cache URLs = LEAVE ALONE
Force Public Cache URLs = LEAVE ALONE
Drop Query String = LEAVE ALONE
2. TTL

Cache TTL is the length of time LiteSpeed Cache keeps a cached file. Once it expires, a new one will be created. Ideally, these settings can and should be left alone. The default settings will be okay.
Your website will only require a shorter TTL if it updates frequently (beyond text edits) and you want to guarantee visitors will see the new cached version. However, this does consume resources and could hurt performance.
3. Purge Settings

When you make any significant changes to your website, it is crucial to purge it so all of your changes can be reflected to your visitors immediately. The purge settings below help determine when and how your website’s changes will show to your visitors.
Purge All on Upgrade = ON
This option selects whether to purge all pages when any plugin, theme, or the WordPress core is updated. LiteSpeed highly recommends leaving this on because each update can bring changes that should reflect immediately.
Auto Purge Rules for Publish/Update = LEAVE AS IS
It’s important to consider dynamic widgets linked to posts on pages other than the front or home pages before selecting all pages. Whenever a post is published or updated, not only does the post page change, but also category listings, tag listings, the blog’s front page, and various archives.
To ensure no issues, you can select which types of pages to be automatically purged every time a post is updated or created, depending on your Hello Theme setup and how posts are displayed on your site.
You should only check the options that are necessary to optimize performance. For example, if the site only has a monthly archive and does not have a yearly or daily archive, only the “monthly archive” needs to be checked. Similarly, if the site does not have an archive by author, then there is no need to select it, as it will only slow down the process with extra checks.
Serve Stale = DEPENDS ON YOUR WEBSITE
When you turn this setting on, visitors will be shown a stale copy of a cached page until a new cache copy is available. Whether or not this setting should be turned on depends on how your website is designed. If you use a lot of animations or dynamic content in your webpage designs, this setting could mess them up for your visitors.
However, suppose your designs and content are consistent throughout your website for ALL visitors. In that case, a stale version of your web pages saved in the backend can ensure they load quickly for new and returning visitors.
Scheduled Purge URLs = DEPENDS ON YOUR WEBSITE, BUT LEAVE OFF
Unless your website has pages that should be purged at a specific time, separated from the rest of your website, this setting should be off.
Scheduled Purge Time = LEAVE BLANK
Purge All Hooks = LEAVE AS IS
4. Exclude Settings

If you look at the above screenshot, you will see that I have URL paths for my sitemap in the Do Not Cache URLs setting. This is because, at one point, Google Search Console could no longer read my website’s sitemap.
Why? To this day, I still have no idea. Thankfully, my SEO plugin had a fix for this issue specifically for LiteSpeed Cache users. What you’re seeing above is that fix.
Please remember this after following my guide if you suddenly experience this issue. Otherwise, this entire section should be left alone unless you have pages on your website that you do not want cached.
5. ESI Settings

According to LiteSpeed, Edge Side Includes (ESI) allows pages to be cached for logged-in users. ESI enables you to separate parts of your dynamic page and assemble them to create the complete page. In other words, ESI lets you create “holes” in a page, which can be filled with content that may be cached privately, cached publicly with its own Time-To-Live (TTL), or not cached at all.
This entire section can be left alone unless you must change these settings and know what you’re doing.
6. Object Cache Settings

Object caching can significantly benefit your website’s performance by reducing the time it takes for the server to retrieve frequently accessed data. It involves storing commonly used data in the server’s memory to recover and deliver it to visitors quickly. This helps reduce the server load and can significantly improve page load times, leading to a better user experience and improved search engine rankings.
Enabling object caching can create a faster and more efficient website better equipped to handle high traffic and user activity levels.
Object Cache = ON
This setting ensures that the Object Cache feature is indeed turned on.
Method = REDIS
There are two popular methods for object caching: Memcache and Redis. Usually, hosting companies choose which method to use for their customers’ websites. However, if you have a hosting company like mine, ChemiCloud, you can select the best method for your website yourself.
More hosting companies should provide multiple object caching methods and allow customers to choose the best one for their websites. While Redis and Memcache have no significant difference in core functionality, they produce different results for each website. How your website is designed and functions can help determine which method best supports it.
If your hosting company allows you to choose, I recommend picking REDIS as your object caching method over Memcache for the following reasons:
- Redis supports more complex data types, such as lists, sets, and sorted sets, allowing more advanced data manipulation.
- Redis has better persistence options, meaning data can be saved to disk and recovered after a server restart or crash.
- Redis has better scalability options, including support for clustering, which allows for horizontal scaling across multiple servers.
For all settings from Host to Do Not Cache Groups, your hosting provider should have instructions on setting them up or leaving them alone. Settings to leave alone are:
- Default Object Lifetime
- Global Groups
- Do Not Cache Groups
Persistent Connection = ON
This setting helps with uptime by using keep-alive connections to speed up the caching process.
Cache WP-Admin = ON
This helps improve the speed of your WordPress admin interface.
Store Transients = OFF
Only turn on if Cache WP-Admin is OFF.
7. Browser Cache Settings

Browser Cache = ON
LiteSpeed Cache provides the Browser Cache setting for users who do not have access to their server’s admin. Regardless of whether you do, this setting should be turned on. It stores static files such as images, videos, and CSS locally on visitors’ devices. This helps make the retrieval of those files much faster, resulting in better website performance, especially for repeat visitors.
If visitors do not want this, they can delete their cache and cookies from their browser. This can be done at the same place where you can delete your browser history.
Browser Cache TTL = LEAVE ALONE
8. Advanced Settings

For the Advanced Settings section, leave everything off and alone, especially Instant Click. I bring this up because you will be inclined to turn it on when you see it. This setting preloads the page where a visitor hovers over its link on the current webpage.
While this does make loading that page much faster if the visitor clicks on its link, this setting has nothing to do with the initial page load for them. When turned on, this setting slightly decreases website performance because your site will have to preload the pages to which the current webpage links. As a result, a mid-level warning will likely appear in your Page Speed Insights test results.
CDN
A CDN (Content Delivery Network) is a network of servers strategically placed worldwide to provide faster and more reliable delivery of website content to users. When a user visits a website, the CDN will serve the content from the server closest to them rather than from its origin server. This results in faster load times and a better user experience for visitors.
CDNs are essential for websites because they help improve performance, reduce load times, and increase reliability.
By serving content from a server closer to the user, CDNs lessen the time it takes to deliver content, resulting in faster load times and a reliable user experience. This is particularly important for websites with a global audience and already receive high traffic levels.
The most popular CDN on the market is Cloudflare. However, the LiteSpeed Web Server has its own robust CDN called QUIC.cloud. Both can be integrated with this LiteSpeed Cache plugin. It is just a matter of which is best for you and your website.
1. CDN Settings

Before switching to my current hosting provider, ChemiCloud, and LiteSpeed Cache with QUIC.cloud CDN: I used Cloudflare CDN for my website. Honestly, they were great! I made this decision later in my website-building journey. I was grateful but also upset I didn’t use them sooner because my consistently poor website performance held it back.
However, since ChemiCloud uses LiteSpeed Web Servers for my website, I decided to switch to the compatible QUIC.cloud CDN. Even though Cloudflare CDN can be easily integrated into LiteSpeed Cache, I figured it would be ideal for my website’s performance to keep the entire LiteSpeed Web Server ecosystem implemented and working together.
Many online articles and forum threads debate which CDN is the best. I concluded that QUIC.cloud is working perfectly fine. It’s working so well that I forget it is even turned on half the time. So far, I have no issues whatsoever.
One good thing about QUIC.cloud CDN is that I’ve only experienced one CDN-caused outage so far. In fact, since switching to ChemiCloud hosting, I have rarely experienced any outages at all. Under my previous hosting provider, out of the several outages my website has experienced, some were briefly caused by Cloudflare, while the hosting provider caused others.
QUIC.cloud CDN = Depends on your CDN choice
Suppose you decide to use QUIC.cloud CDN, this setting just officially turns it on.
Use CDN Mapping
This setting should stay off. It is only required if you use a CDN other than QUIC.cloud or Cloudflare, which you likely will not.
Therefore, leave all settings from CDN Mapping to Exclude Path alone.
Cloudflare API = Depends on your CDN choice
If you decide to use Cloudflare CDN, here is where you can integrate it into LiteSpeed Cache.
2. QUIC.cloud CDN Setup
This section is only for you if you decide to use QUIC.cloud CDN. Here is where you would link your QUIC.cloud CDN account.
3. Manage
This section is where you can manage whichever CDN you choose.
Image Optimization
Suppose you decide to use QUIC.cloud CDN, you have access to LiteSpeed Cache’s Image Optimization feature. This is great if you want an all-in-one solution instead of paying for a separate plugin.
1. Image Optimization Summary
This section is just a general summary of information on your optimized images.
2. Image Optimization Settings

Auto Request Cron = ON
When turned on, this setting sends requests to optimize newly uploaded images.
Auto Pull Cron = ON
This setting MUST be turned on, especially if Auto Request Cron is on. If turned off, information on optimized images will stop being pulled from the QUIC.cloud image server.
Optimize Original Images = ON
Whether the image is a JPG or PGN file, this setting will optimize them and save a backup.
Remove Original Backups = OFF
I would leave this setting off because, god forbid, if something happens to your photos, you cannot restore the original image files if you turn this on.
Optimize Losslessly = Your Choice, but ON
Lossy and lossless are two types of compression methods used to reduce the size of digital files. Lossy compression involves removing some of the data from the original file, resulting in a smaller file size and a loss of quality. On the other hand, lossless compression reduces the file size without losing any data, resulting in a file identical to the original.
The main difference between lossy and lossless compression is that lossy compression sacrifices some quality to achieve a smaller file size. In contrast, lossless compression maintains the quality of the original file.
It is entirely your choice how you want to optimize your images. If you follow the rest of my setting recommendations, your website should still perform well no matter what. All LiteSpeed Cache warns is that the image file size may be larger than lossy compression. Because I have a lot of photos from my portfolio and other blog posts, it is ideal for me to optimize my images in a way that maintains their original quality.
Preserve EXIF/XMP Data = OFF
Keeping this setting off will help keep your image file sizes low. Preserving EXIF/XMP data means keeping the image’s copyright information and other data when optimizing, which increases the file size.
Image WebP Replacement = ON
I recommend turning this feature on because serving your images in WebP format is one of the best things you can do for your website. WebP is an image format created by Google and designed to provide a more efficient way to store and deliver images on the web. It achieves this by using advanced compression techniques that can reduce the file size of images by up to 34% compared to JPEG and PNG formats while maintaining similar image quality.
Websites that use WebP images can load faster, use less bandwidth, and provide a better user experience for visitors. Additionally, WebP images are supported by most modern web browsers, including Chrome, Firefox, and Microsoft Edge, making it an ideal image format for the web.
According to LiteSpeed, two things will happen when this setting is on:
- All future image optimization requests will be generated in WebP format while optimizing the original images.
- Images will be served in .webp instead of .jpg or .pgn to support browsers. If a visitor uses an unsupported browser to visit a web page with WebP images, LiteSpeed Cache will serve a version of the original file type.
WebP Attribute to Replace = LEAVE ALONE
This lists the element attributes that will be replaced with WebP. Usually, this is updated automatically. However, if you know the image attribute you want to ensure is served in WebP format, you can add it here.
WebP for Extra srcset = ON
This setting ensures that images in custom code also serve as WebP. I have turned this setting on for my website because I display ads, embed affiliate widgets with images, and use my social media feeds on my Portfolio, which includes photos. If you plan on embedding images via custom code, you should probably have this setting on.
WordPress Image Quality Control = LEAVE ALONE AT 82 OR 85
Based out of 100, this is the amount of image compression quality. The default value is 82, which is perfectly fine. However, if you want to ensure you are complying with Chrome Developer Tools Lighthouse standards, Tom from OnlineMediaMasters recommends changing it to 85.
Page Optimization
The Page Optimization section was the most challenging to set up, and it stressed me out. I even waited to write this section last so I could explain these settings as effectively as possible. Despite the difficulty, this section of the LiteSpeed Cache plugin has helped me achieve the positive performance results my website receives, regardless of which page builder I use.
Nine times out of ten, your website is not set up the same as mine. For example, you could use either Elementor Pro with the Hello Elementor theme or Kadence WP with all its settings for its theme and all its Gutenberg blocks. My ideal page optimization settings below are meant to be a baseline guide for you to work with as you discover your website’s best settings.
I recommend creating a staged version of your website before testing these settings. Extensive testing will be required to determine which settings are best to achieve performance results similar to mine for your website. A staging site ensures you can do all your desired testing without impacting visitors’ experience.
1. CSS Settings
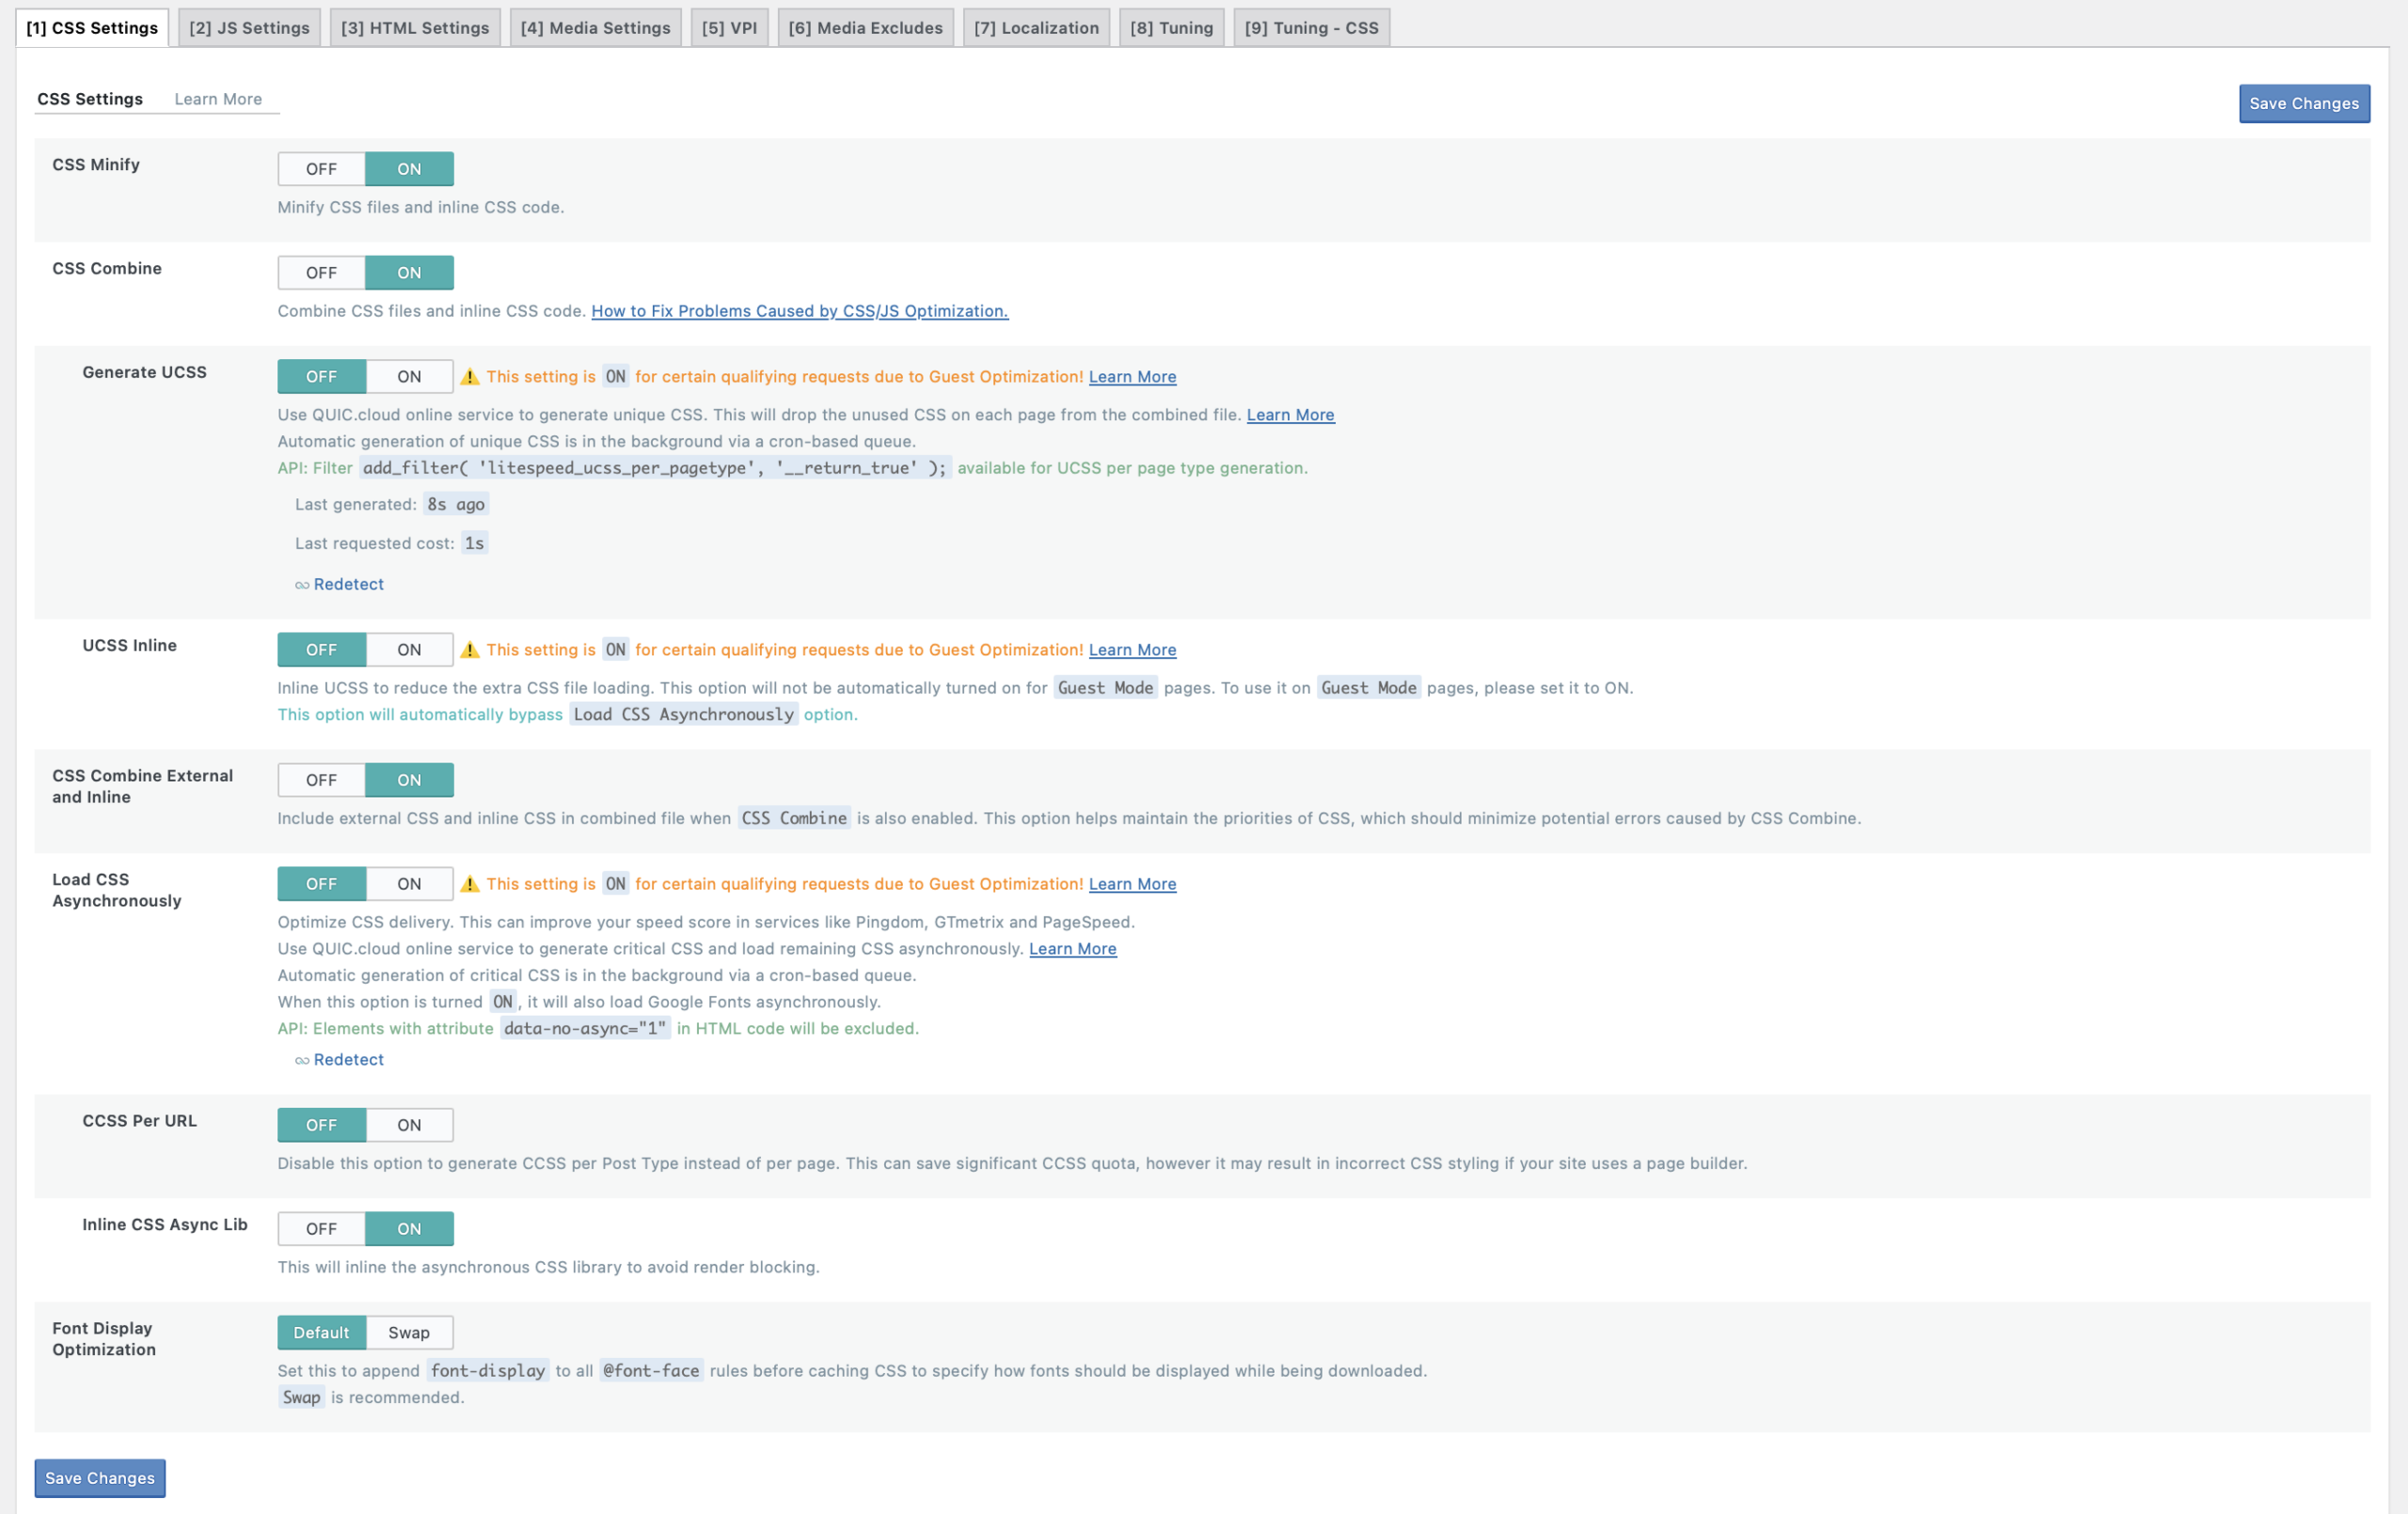
This section contains LSCache CSS optimization settings. Optimizing your CSS can reduce the size of your website’s stylesheets, improve page load times, and enhance user experience.
The CSS settings for my website below are based initially on using Elementor with QUIC.cloud CDN.
However, even though I am now using Kadence WP, the settings below remain unchanged. Some of these settings are specifically for QUIC.cloud CDN to be able to manage my website’s CSS files. So, if you are not using QUIC.cloud CDN for your website, some of these settings should remain off.
CSS Minify = ON
This setting removes all unnecessary characters that can accumulate from your chosen page builder from CSS files. Those unnecessary characters can include:
- Extra white space
- New lines
- Comments
CSS Combine = ON
This setting combines all individual CSS files into one file. Depending on how your website is designed, this setting may be turned off. Therefore, please test this setting first. LiteSpeed warns about disk space potentially filling up because pre-made themes tend to insert random strings into the CSS.
Combining the CSS files of your WordPress website helps:
- Reduce HTTP requests required to load your website.
- Reduce the amount of code that needs to be downloaded by your visitors’ browsers.
- Simplify your website’s code.
These benefits help significantly improve your website’s loading speed for you and your visitors. At the same time, they help you manage and update your website more easily.
Generate UCSS = OFF
Generate UCSS is a QUIC.cloud online service that creates a single streamlined CSS file for each of your web pages. It also removes unused CSS and includes only what is needed to render your web pages.
I prefer to keep this setting off, even though it is technically on when ‘Guest Optimization’ is turned on. This way, this setting only kicks in whenever the ‘Guest Optimization’ setting feels like Unique CSS needs to be generated for a specific webpage to ensure it loads efficiently and does so automatically.
UCSS Inline = OFF
Similar to the Generate UCSS option above, I also leave the UCSS inline setting off and let ‘Guest Optimization’ apply this setting when it feels it is needed.
CSS Combine External and Inline = ON
Only turn this setting on if CSS Combine is also on. It helps maintain the priorities of CSS and reduces extra file loading.
Load CSS Asynchronously = OFF
Load CSS Asynchronously loads both CSS, HTML, and Google Fonts at the same time. QUIC.cloud’s online service typically generates critical CSS and loads any remaining CSS script asynchronously.
I tested this with other settings and concluded that it should remain off. While this setting can improve page load time, it can also ruin the formatting of your web pages’ design. This is especially true if you design any pages with sticky or responsive elements, such as your header/top navigation bar, sidebar section, table of contents widget, etc. Those elements will no longer be sticky or responsive.
Loading CSS Asynchronously is part of the Guest Optimization setting we turned on earlier. Keeping this setting off will ensure it only works for qualifying requests due to Guest Optimization. For our type of website, this is probably best. I also leave “CCSS Per URL” OFF, but turn ON “Inline CSS Async Lib” to avoid render blocking.
Font Display Optimization = DEFAULT
This setting determines how your website’s text font is processed. I recommend leaving this setting alone because, whether you use Elementor or Kadence WP, you already set up how you want to display fonts within their settings.
For example, as mentioned above, I recommend using default Serif-sans system fonts for Elementor, so this setting does not need to be turned on. Also, with Kadence WP, we already have Load Google Fonts Locally and Preload Local Fonts turned on. Leaving this setting alone at default ensures that LiteSpeed Cache does not interfere with the font settings set forth by Kadence WP.
2. JS Settings

No matter which page builder you use to design your website, you will accumulate many JavaScript files that need to load. The settings below help ensure these files load in a structured and organized way, according to how you intend your visitors to interact with your website.
JS Minify = ON
JS Combine = ON
JS Combine External and Inline = ON
Load JS Deferred = DEFAULT or DELAYED
Choosing the right option for this setting depends on how well your website’s visual design responds. You can either defer JavaScript until the HTML is done loading or delay it until user activity is detected.
I tested both settings and determined that DELAYING JavaScript is the best option for my website. Based on website performance test results, JavaScript files do not load until a visitor interacts with the area of a webpage where they are located. The deferred setting, on the other hand, will still load all files, regardless of whether or not they are required by a visitor, reducing the page load speed.
The nearby screenshot shows that this setting remains at DEFAULT because I use Perfmatters to delay the JavaScript files on my website. I have to use Perfmatters because I use some third-party scripts on my website, which include their own JavaScript files. I have noticed that LiteSpeed Cache’s delayed JavaScript function does not fully optimize all of these files as well as Perfmatters.
Read More: My Limited Perfmatters Settings for WordPress Websites Using LiteSpeed Cache >>>
3. HTML Settings

Optimizing your HTML settings is another way of reducing page load times. It can also help improve user engagement by loading what needs to be loaded on time.
HTML Minify = ON
Minify HTML the same way you would for CSS and JavaScript.
DNS Prefetch = Your decision
Prefetching DNS can reduce latency for your visitors when they click on external links, especially on mobile networks. You should only include external domains that are linked and loading on your website. However, not all external domains should be added to this list. Therefore, some testing will be required.
DNS Prefetch Control = ON
Turn this setting on because it automatically prefetches all URLs in a webpage, including images, CSS, JavaScript, and more. As a result, page loading speeds can improve.
DNS Preconnect = Up to You
I would leave this setting alone unless you know what you’re doing.
HTML Lazy Load Selectors = Up to You
This setting allows you to lazy load specific HTML content by its selector. Whether you are using Elementor or Kadence WP, enter the CSS ID or Class you name for each section or widget you want lazy loaded in this text box.
Remove Query Strings = ON
Turn this setting on to decrease page load times. It removes query strings from static resources so they can be cached.
Load Google Fonts Asynchronously = ON
Since I recommend you leave Load CSS Asynchronously off (which would have also loaded Google Fonts), turn Load Google Fonts Asynchronously on. This method loads your font separately from CSS and implements a pre-connect for Google to establish a connection quickly.
Whether you use Elementor or Kadence WP, you will have plenty of font options. The problem is, in most cases, you will not know right away that the font(s) you chose are indeed a Google Font. Also, with Kadence WP specifically, you already set your fonts to load locally in the theme’s performance settings.
Turning this setting in LiteSpeed Cache on ensures that your selected font loads in a way that does not hinder your website’s performance. If you’re using Elementor and chose not to implement Google fonts, this setting should be off. However, if you’re using Kadence WP, this setting should be on so that LiteSpeed Cache knows not to interfere with your theme’s font settings. If anything, this setting helps mirror the font settings already set up earlier.
Remove Google Fonts = OFF
Keep this setting off since you will likely choose a Google font when designing your website with Kadence WP. Only turn off if you can confirm you are NOT using any Google fonts.
Remove WordPress Emoji = ON
I recommend turning this setting off because it is an outdated feature that may slow down your website. According to LiteSpeed, this setting removes the JavaScript file that supports emojis on older browsers. Since most internet users use a modern browser with native emoji support, this feature is no longer needed.
Remove NoScript Tags = ON
I recommend turning this setting on because it will result in a smaller page size, which is critical for website performance and SEO. The only caveat to this setting is you risk making your website incompatible with visitors using older browsers or browsers where JavaScript is turned off for security reasons.
4. Media Settings

The media settings section (in addition to VPI and Media Excludes) is an extension of Image Optimization. Only these settings help you determine how media files on your website, such as images and videos, will load for your visitors.
Controlling how your media loads plays a crucial role in overall performance. If these files take forever to load, search engine crawlers cannot crawl your entire website within the limited time it allows to scan it. At the same time, it will cause an unpleasant experience for your visitors and make them leave your website.
Lazy Load Images = ON
Turning on this setting is mandatory. It only loads images once visitors scroll to where they are on the webpage.
Basic Image Placeholder = Up to You, but ON
Changing this setting is entirely optional. Even the default gray placeholder is acceptable. This setting applies a simple placeholder over an image while it finishes loading.
Responsive Placeholder = ON
When the images on your website load, the layout of the overall webpage can shift and reshuffle. Search engines typically do not like this because it can alter your visitors’ experience for the worse, especially if their connection (and your website) is slow. Therefore, it will be flagged in your website performance test results.
By turning on Responsive Placeholder, as long as your images have their width and height attributes set, a placeholder will be generated in their place while loading.
Responsive Placeholder SVG = LEAVE AS DEFAULT VALUE
Responsive Placeholder Color = Up to You
Gray is the default color. However, if you want to change it, you can.
LQIP Cloud Generator = ON
You must be using QUIC.cloud for this setting to work. They have an LQIP (Low-Quality Image Placeholder) generator service if you want more responsive image previews while they’re loading. However, keep this setting off if you want plain color placeholders (which do not always look nice).
LQIP Quality = 4
The default setting is 4, so leave it alone. The higher the number, the larger the files become, which means larger page sizes and load times.
LQIP Minimum Dimensions = 150 x 150 pixels
Unless you know what you’re doing, keep the default dimensions as-is.
Generate LQIP in Background = ON
This setting automatically generates LQIP in the background, so web pages load quickly. If this setting is turned off, LQIP will be rendered in the foreground for visitors, slowing down the time it takes for the page to load for them.
Lazy Load Iframes = ON
An iframe is a way to display content from another website or web page within your page. This is often used to display ads, videos, or other types of content on a webpage without redirecting the user to another website. Just like images, it is best to lazy load this as well.
The only issue you could have with this setting is if you are displaying ads on your website. Lazy-loading ads could negatively impact your revenue. However, as long as your website is well-optimized, your ads should load immediately.
Add Missing Sizes = ON
The Cumulative Layout Shift is a crucial Core Web Vitals metric in your website performance tests. It calculates whether and by how much your webpage’s layout changes as elements load. You want to keep this as minimal as possible. Turning on Add Missing Sizes helps ensure this. It will explicitly set the width and height of image elements so they do not shift as your web pages load for your visitors.
5. VPI

Viewport images are the first images that search engine crawlers and visitors see on a web page. Typically, this is a featured image or banner at the beginning of a blog post or any other web page. Because these images are “above the fold,” they should be able to appear right away and not be lazy-loaded.
Unfortunately, when you lazy load your images and iframes, ALL of them, no matter where they are on the web page or their purpose, will lazy load. Lazy-loaded photos above the fold could negatively impact performance.
Viewport Images = ON
Turning on Viewport images ensures that the most critical images at the beginning of a webpage are included in the initial web page load. It prevents them from being lazy-loaded like the rest of the pictures on a webpage. For this setting to truly work, you must be using QUIC.cloud.
Over time, I have noticed that despite this feature being on and processed by QUIC.cloud CDN, sometimes, images above the fold are still loaded after content below the fold. As a result, I also turned on Preload Critical Images in Perfmatters and set it to ‘1’ to help ensure that ONLY the featured image of a blog post or page was loaded right away.
Viewport Images Cron = ON
This is done in the background, so you can also turn this on.
6. Media Excludes

Even though you’ve turned on Viewport images, the settings are not always perfect. It may forget to prioritize an image. At the same time, there may be other media files throughout a webpage that you may not want to lazy load. This entire section is where you would indicate which media files you do not wish to lazy load, regardless of where they are on a web page.
[kadence_element id=”26565″]
7. Localization Settings

Gravatar Cache = ON
When building a website with WordPress, you can add a profile picture or Globally Recognized Avatars. Also known as a Gravatar, that picture will show up when you leave comments on other WordPress-built blogs and websites. When turned on, this setting locally caches your visitors’ profile picture next to their comments on your blog posts.
Gravatar Cache Cron = ON
This setting should be turned in as well.
Gravatar Cache TTL = LEAVE ALONE
The default setting of 604800 is fine.
Localize Resources = OFF
You do not need to utilize this feature unless you are not using Guest Mode. Its only purpose is to localize external resources on your website so that they load faster. In the Localization Files text box below, add each URL for the external resources in your website performance test results.
8. Tuning Settings – JS

Tuning JavaScript settings is helpful if you are not using Guest Mode or Optimization. However, some JavaScript resources can still flag errors in your web performance test results even with Guest Mode and Optimization turned on. This section is where you address those JavaScript issues, specifically in the JS Delayed Includes text box.
Other than that, what is entered into the JS Excludes and JS Deferred / Delayed Excluded text boxes is fine. Just make sure that Optimize for Guest Only is turned ON and no Role Excludes options are checked.
9. Tuning Settings – CSS

After testing LSCache plugin features, I’ve noticed that when Guest Mode or Optimization are turned on, these Tuning Settings for CSS will not do or change anything. However, this section will take the most time to work through when optimizing your website without Guest Mode or Optimization.
Database

This section is where you can mass delete files and data to clean up your website. First, with a Clean All option, you can also choose to delete:
- Post Revisions
- Auto drafts
- Trashed posts
- Spam comments
- Trashed comments
- Trackbacks/Pingbacks
- Expired transients
- All Transients
- Optimize tables
In addition, you can set the maximum number of revisions you want to keep and the number of days to keep them.
Crawler

You do not have to do anything with this section if you have a shared hosting plan, which you likely do because they are the most economical for small business websites. The likely reason is that your hosting provider will prevent access to the features in these settings.
Hosting providers will likely prevent users on shared hosting plans from using the Crawler features because this uses up many server resources. As a result, websites on a shared server using these crawler features could ruin the performance of other websites sharing the same server.
Rest assured, your website will not have issues being crawled due to not having access to these features.
Toolbox

The only settings you want to change are the Heartbeat settings; specifically, disable them. Disabling WordPress interval heartbeat can improve website performance and reduce server load. However, it can also have some drawbacks. By disabling heartbeat, some WordPress features such as autosave and post locking may not function properly.
If you’re experiencing high server loads or performance issues, temporarily turn off the heartbeat API and monitor your website’s effects. But if everything is working fine, disabling it is unnecessary. My site does experience high server loads. Therefore, I decided to follow Tom from OnlineMediaMaster’s advice and disable WordPress Heartbeat. Here are his suggested settings:

Frontend Heartbeat Control = ON
Frontend Heartbeat TTL = 0
Backend Heartbeat Control = ON
Backend Heartbeat TTL = 0
Editor Heartbeat = ON
Editor Heartbeat TTL = 120 seconds = 2 minutes
Final Thoughts
Thank you for reading through my ideal LiteSpeed Cache settings for WordPress websites. If you followed my guide all the way through, I hope your website performs just as well as mine. I also hope you have similar performance test scores to verify the improvements.
If not, continue to test setting changes until you find the ones that best optimize your website. You may have to spend more time in the Page Optimization section. I also recommend considering the same backend setup and services.
This first includes switching to a hosting provider that uses LiteSpeed Web Servers for its hosted websites, such as ChemiCloud. It also includes implementing Perfmatters to optimize your website even further than LiteSpeed Cache could.
Having the same backend setup and services involves fully implementing Elementor or Kadence WP to design your entire website. This involves investing in the plan that offers the most features and using its theme to the fullest extent to help create all aspects of your website. This way, you are not limited to design potential and loading resources you do not intend to use.
Finally, if you use a lot of third-party scripts and code on your website, consider implementing Perfmatters to improve your website optimization even further. If these settings worked for you and your website, comment with your feedback. Also, if you have any further questions or concerns, message me.

2 Comments
Leave a Reply
Related Posts 


I use Kadence and host with Chemicloud. I use very similar settings after finding the same article you reference, I just don’t use a CDN (partly because my visitors are based in same country but also because I’ve had CDN issues in the past and don’t feel I need one).
Generally I like to use a sticky header in Kadence but I find it doesn’t work with these lightspeed cache page settings. I think it’s to do with JS combining but haven’t been able to establish which JS file I need to exclude. I’m currently deciding whether to keep digging or just stop using the sticky header feature on my websites.
For optimizing JavaScript, I mainly use Perfmatters rather than LiteSpeed Cache’s settings. Check out my Perfmatters Settings for how I do so.